Cobble it together and gobble it up!

Tuesday, 30 August 2011

Barbeque Rib eye Beef, with Asian Salad, Noodles & Chilli Caramel

For this meal we barbequed a beautiful bit of Rib eye beef and served it with an Asian inspired salad of a whole rainbow of fruit and vegetables with egg noodles and a chilli caramel sauce.
The Asian salad included the following ingredients chopped finely (in some cases on the mandolin);
  • baby cucumbers (sweeter and less inclined to cause indigestion to those that suffer with this)
  • carrots
  • fennel
  • red cabbage
  • mango (hard not ripe)
  • coconut
  • mint
  • coriander
  • red pepper
  • Chinese leaf cabbage


To make the chilli caramel, you need to chop following ingredients and heat until a flavourful caramel becomes thick and tasty
  • Palm sugar
  • Whiskey
  • Lime juice
  • Lime zest
  • Tamarind paste
  • Chillies
  • Garlic
  • Fish sauce
  • Bit of water


Friday, 26 August 2011

56 Days of Summer - The 'To Do' List - How we did


At the beginning of the summer holidays we all sat down and made a list of 56 things we would like to do over the summer. Here is the list now we have reached the end of the summer holidays. We managed 50/56 which I think is pretty good really considering how badly the rain hindered the feeling of it being summer at all! Now I think we shall sit down and make a list for Autumn. It was a good way of finding something to do when the 'I'm bored's start up and helped give us a plan for when the routine of school left us a bit 'all at sea'!
  1. Have a BBQ  - We didn't manage this in Scotland as weather has not permitted but we did have one down South
  2. Go camping again - Given that the first time we went Max ended up in hospital we haven't managed this! But we still intend to try in September if the weather allows
  3. Party - We had some great parties, but our favourite was Poppy Cottage Day!
  4. Mini golf - Still to do - the blooming weather again!
  5. Make paint spot garland - Done (see earlier post)
  6. Go on a scavenger hunt - Done in the woods (see earlier post)
  7. Lego photo stories - Still to do. Need to get the boys to write a story first for the lego to act out!
  8. Go to see Kung fu Panda 2 in cinema - Tick
  9. Work 4 money to buy more lego  - A great way to encourage good behaviour. Boys got 20p if could stay on 'green' on behaviour chart all day. They earned £11 between them.
  10. Take a family pile up photo - Done but not that well. Will try again.
  11. Playground chalk art  - Done but will do more. We only managed to do it at home as the playground was already chalked up!
  12. Make moon sand - Check. However the lid got left off the sand pit while we were away and it really started to smell, so  that has gone!
  13. Fly a kite - Some successful attempts at Elie beach with pocket kites and the ones they got for Xmas last year
  14. Do ice picking for treasure - need to wait until have enough room in the freezer to make the big block of ice!
  15. Visit Aberdour beach - done. Was very busy!
  16. Learn to make ice cream cones - have the recipe but still need to create!
  17. Bubble target practice - See earlier post
  18. Teddy bear pancakes - Ditto
  19. Ravenscraig Park on Weds - managed only 2 Wednesdays due to bad weather!
  20. Water pistol shoot out - At Granny's - great fun!
  21. Beveridge Park to feed ducks - The ducks don't mind the rain!
  22. Write the family rules - Decided and agreed but not up on the wall yet!
  23. Animal exhibition @ Museum - Yep.
  24. Make dinosaur tails - See earlier post
  25. Library visits - Yes, twice. We have moved onto having longer stories now without pictures to listen to at bedtime, which Mummy is very excited about. Won't be long until they are ready for Harry Potter.
  26. Crab croissant lunch - See post
  27. Family movie night - Tick
  28. Woodland walk - Tick, tick
  29. Make a rainbow jamjar cakes - mmmmm see post!
  30. Hand and foot paintings - see post
  31. Build dinosaur land - another post!
  32. Make Galaxy playdough - and one more post!
  33. Plant flowers - the boys did a great job and we have had colour in the flower bed all summer
  34. Go out for lunch - quite a few times in fact!
  35. Have a special  family dinner - yes
  36. Visit soft play place - yes - not weather dependent!
  37. See planes at Headcorn Airport - and we had a lovely picnic there too
  38. Cardboard sculpture - did some junk modelling but not what I had in mind when I wrote this
  39. Bike ride on promenade - yes a couple of times
  40. Bath crayons - yes and how I regret this idea!
  41. Lincolnshire research trip - we did research and confused the children massively!
  42. Make cocktails - kiddy ones and grown up ones too!
  43. Charlie's christening - We had a fabulous time
  44. Visit Ruins in St Andrews - boys ran riot and I think we read out half the headstones at Ollies request!
  45. Stay with Granny & Grandpa - wonderful time!
  46. Make fancy ice cream - yes, yes, yes, yes, yes, yes, yes
  47. Stay with Nanny Noo - we sure did"!
  48. Learn to ride without stabilisers - not quite but very close - maybe only a couple more tries
  49. Go to seaside - and how many seasides we saw (maybe 6?)
  50. Outdoor games tornament - Daddy won - but he cheated!
  51. Take Gran-nan out for her birthday - for a lovely pub lunch
  52. Go to Dunfermline park - but we will go this weekend as there is the Robert the Bruce festival on!
  53. Make a marble run - see earlier post
  54. Go for a country drive - loads of them as the weather was too bad 
  55. Create a castle den - see this week's  posts
  56. Go to MacD's - we did and only twice! Once on the first day of the holidays and once on the long drive home from England.

Thursday, 25 August 2011

MDF letters for childrens' names


Just thought I would post this as I really like these MDF letters as a means of decorating a wall of the boys bedrooms. The beauty of them is you can paint/decorate them in any colour or pattern you like.
I am sure they have helped them learn to recognise their name quickly too.
For Charlie's name I found a really good supplier of letters on ebay (here). He was quite a lot cheaper than the company I used for the older boys names. And he had a few fonts and could do upper or lower case

Wednesday, 24 August 2011

Roasted Butternut & Sage Risotto with Pine Nuts, Parmesan & Pancetta

This photo does the meal no justice at all! It is utterly delicious. One of my favourite meals of all time.

You need;
1 Butternut Squash
Few Sage leaves
3 Garlic cloves (skin on)
Risotto rice
Stock
Wine ( I had red)
Parmesan (1/3 pack)
Pine nuts (1 pack)
Pancetta

Slice the squash in half lengthways, scoop out the seeds and then cut each half into quarters lengthways again. 
Place in a roasting tray with the sage leaves, garlic cloves and toss in olive oil and season with salt and pepper. Place in a hot oven (about 200*c) for about 30 minutes until soft and coloured up a bit.
Use a hand blender and blend up everything, including the skin of the squash which is perfectly edible, just pop the garlic out of the skins first.
Add the grated parmesan and blend further. It then occurred to me that if I blended in the pine nuts it would make a super pesto paste. So I toasted a whole packet of pine nuts in a dry frying pan, and blended in three quarters of them (leaving enough to garnish).
Meanwhile fry off the pancetta.
And make a plain white risotto base (adding wine then stock slowly to the risotto rise). When the rice is nearly done add as much of the squash paste as you desire (depends on how much rice you have and how strong a flavour you want).
Serve with a sprinkle of pancetta, parmesan and some of the whole pine nuts.

I have enough of the paste left over to use it in something else. So I put it in a jar and covered with olive oil so it will keep longer in the fridge. I think it will be just as good with some nice pasta - maybe some homemade Papperdelle? I may try it in combination with some wild mushrooms or maybe some chilli to give it some attitude!

Tuesday, 23 August 2011

Castle den

The boys are constantly taking all the cushions of the table and grabbing all the throws and blankets to make some sort of den, play house or camp. And it drives me a bit crazy. I wouldn't mind but it is literally every day. So, inspired by something I saw here, I decided to make them something which might mean my sofa stays together more often.
They are crazy about playing knights and dragons (wearing the dinosaur tails I made them) so I thought I would make it a castle theme.


There are loads of wendy houses on the market but I always thought they just took up too much space, were too expensive or a bit flimsy, but this solution is brilliant. You make it to fit over your table! Perfect - no extra space, nice and sturdy and super cheap (and easy) to make in an afternoon!
You will need;
A kingsize flat sheet (or table cloth or large piece of material)
Scraps of material
Pins, Needle, Thread
Scissors
A sewing machine

I bought a flat, kingsize sheet in grey from Asda's (for just £8), flung it over the table and pinned it together so it fitted around the table (but not too tight). I did have to use some of the off cuts from the corners to make one side long enough but it was easy enough. I then ran it through the sewing machine.
I then used the rest of the off cuts to make 2 little turrets which I stuffed with some cushion stuffing I had left over from the dinosaur tails. I cut a door shape from an old brown towel I had knocking around, pinned and then sewed it on to one side and then cut one straight line up it to create an entry way.
I used Ollie's old school sweatshirt to cut 2 castle window shapes, which I pinned on and then hand sewed. I then cut out the window slot. Because of the window shape the window holds it's shape quite well. If you do a traditional square it would need some dowel or cane in it to support the shape and stop it sagging.

And that is it! I even got to play at being a princess. It seems you don't have to have girls to be able to play princesses!
You could do all sorts of designs, shops, circus tent, army camp, school, house. I am trying to think of another design for the other side so you get 2 for the price of 1.
Or maybe I'll just buy another sheet, it's not like it takes up much space!

Monday, 22 August 2011

The Hermitage

Yesterday we went on a wonderful walk and picnic in a place called The Hermitage.
It was a beautiful walk through what were in fact man made forest of huge tall fir trees, nect to a gorgeous gushing river to a folly which allowed you to stand out over the waterfall.
We had to drive for about an hour to get there but it was well worth it. The boys had great fun playing hide and seek, jumping on and off tree trunks and big rocks, and making my heart skip beats every time they went a bit too close to the edge!
Even the drizzle didn't put a dampener on the day and we will be heading back there very soon.
 

Sunday, 21 August 2011

How long until Christmas!

Now we are back at school we are already getting the questions about how long it is until Christmas!
To try and help the situation (without getting the calendar down off the wall every time) we made a month list for the boys bedroom wall.
Each month is decorated to try and illustrate what is happening that month (holidays/weather etc) and also include little pictures of the family members who have a birthday in that month.
Hopefully it will help the older ones to learn the names of the months better as well as give them some frame of reference for just how far away Christmas still is!

Friday, 19 August 2011

Wholemeal Cherry & Almond Bakewell Muffins


Ingredients (this is approximate as I made up a big batch and divided it into 3 to make three different types of muffin. I can recommend making the bigger batch as the mix keeps in the fridge as a batter for a good 2 weeks - I will put the big batch totals in brackets)
  • 1 egg (3 eggs)
  • 33g caster sugar (100g caster sugar)
  • 42g dark brown sugar (125g d. brown sugar)
  • 166ml milk (500ml)
  • 40ml veg/sunflower oil (125ml)
  • 75g wholemeal flour (225g wholemeal flour)
  • 10g rye flour (30g - this was an experiment as I had some to hand!)
  • 75g plain flour (225g)
  • 1 tsp bicarb (2 rounded tsp)
  • pinch salt (1/2 tsp)
  • 1 drained tin of black cherries (plus a small amount of juice from tin)
  • handful ground almonds
  • 1 tsp almond essence
  • 2 tbsp icing sugar
  • few drops of water.


Method
  • In a food mixer, whisk the sugar and eggs. The add the milk, oil and mix. 
  • Change to a dough arm and add flours (plain, wholemeal and rye - I didn't bother sifting), salt and bicarb. Stir until blended. The batter should be quite wet.
  • (If making the big batch, this is the point I divided it into 3)
  • I then stirred in the cherries, ground almonds, almond extract and a small amount of the juice from the tin to loosen the batter again.
  • I put this into 6 muffin cases in a muffin tray. I filled them to the top with mix.
  • I cooked this in a fan oven preheated to 190*c, for 15mins (or until set and spongy)
  • Cool on a wire rack.
  • Make up quite a stiff glace icing with the sugar and water and dollop onto the tops to give it a bakewell tart finish. If I had had some glace cherries I may well have popped one on the top to finish it off! I do love a glace cherry but I realise this is quite controversial!

If you are interested what I did with the other 2 batches,  I have made straight blueberry muffins a couple of days ago, and I intend to make coconut and lime muffins at the weekend with the last batch.

Wednesday, 17 August 2011

Personalised Guess Who Game

I made this about 4 months ago but the boys were playing with it yesterday and it made me think to post it. It's been done loads before but it is a good idea as it really does make the game more fun and therefore played more so it's worth the effort. The key is to make sure you have enough people with hats! Fortunately about a third of our family wear glasses so that helped too. Otherwise there aren't enough variations to ask questions about. Though with the personalised version you can ask if they are a child or an adult, and with our version whether they are human or animal as we included our pet cat!
I used a cheap version from Asda. Copy and pasted photos of family and friends into Word and fiddled about with the cropping and sizing to get them to fit the board. Then printed off three copies, one for each board (though remember to stick them on in different orders for each) and one printed on card to use as the ones to pick who you are guessing about.
The proper version states the game is for age 6 and up, but both Max (3) and Ollie (5)  can play it largely unaided, Max just needs reminding not to tell who he picks up at the start of the game and needs someone to say which ones to put down.

Tuesday, 16 August 2011

Quick homemade game to help with addition to ten

Feeling very conscious that Ollie returns to school tomorrow and we have let his reading and maths slip rather from lack of practice!
Quickly whipped up this game to help him remember the pairings of numbers that add up to ten. It's based on memory but the pair you turn over must add up to ten. I made it by quickly writing the numbers on paper and then I had to stick extra paper on the back as you could see through the back otherwise. You could do it on card and spend a lot more time on making it look good. 
He's definitely worse than he was at the end of last term, but he was getting quicker by the end of the second game!

Monday, 15 August 2011

Quilt update - Charlie's baby quilt & the Spring side of my first quilt

Just thought I would give an update on the quilting situation.

Firstly, and most importantly, the quilt my friend made for Charlie has been completed and received! And I am very happy with it. The design was a bit different to the other boys, and it was a bit of a gamble using so much patterned and quite pale materials but I really like the way it turned out.  Thank you so much Barbara for all the boys quilts. We are so lucky to know you and have you as part of our lives.

I also need to extend the thanks to Barbara, for helping me with the second side of my first ever quilt.
Barbara, her husband and my mum all came to stay for just under a week and the board was more than paid for in help with quilting, upholstering and childcare! We had a great time!


The second half of my quilt was quickly finished with the help of an assistant. It is a unique approach I have, I think! Accurate and perfect it is not, but done it is! And I like the pattern and I think the imperfections add to the beauty and makes me know it is mine and made with love and not just bought from a shop! That's what I keep telling myself anyway! Marilyn Monroe once said 'imperfections are beauty, madness is genius'
So here is a photo of the finished 'Spring' side of my Autumn/Spring quilt. I have tacked the two side and wadding together and now I just have to hand quilt the whole thing (which is near enough King Size). It will still be a while before it's finished, but I can't help already planning a Winter/Summer one!


Sunday, 14 August 2011

Salted Caramel, No Bake, Cheesecake with Chocolate Buttons

Now before I give you this recipe, I don't necessarily believe I have found the ultimate salted caramel cheesecake but everyone else in this household pushed down seconds and some thirds so it seemed to have been a big success non the less. Here is this recipe for now, but I will continue to hunt down the nirvana of a cheesecake recipe.
Salted Caramel No Bake Cheesecake Recipe
Base
  • 50g melted unsalted butter
  • 8 plain chocolate digestive biscuits crushed to crumbs
  • Mix together, push into a 20cm cake tin and chill
Cheesecake
  • 5 gelatine sheets (soaked in cold water, drained and stirred into 3tbsp of boiling water)
  • 400ml double cream
  • 100g light brown sugar
  • 50g dark brown sugar
  • pinch sea salt
  • seeds from one vanilla pod
  • 400g cream cheese (I used Philly light)
  • Warm the cream, sugar and salt over a low heat, stirring continuously until it is melted and smells good. Turn off heat
  • Then add the vanilla and the gelatine goo, cool.
  • In a food mixer/blender, whizz the cheese up then add the the cream/sugar/gelatine mixture and whizz again. Pour over the cheesecake base.
  • Chill over night if possible.
Chocolate buttons
I very recently purchased a button mould from ebay. And today I made dark, milk and white chocolate buttons. I love my new purchase and can't wait to find another excuse to use it!

Caramel sauce
6 tbsp caster sugar, melted until light golden brown then add enough cream until a light brown caramel colour and whisk until combined. Chill and use as required. It should store in the fridge for at least a week or two maybe (we'll see!)


Saturday, 13 August 2011

Spanish Chicken and Chorizo Stew with Butter Beans, Olives and fresh Coriander


We served this stew on a bed of basmati rice with chopped sundried tomatoes and coriander spooned through the rice. It really was delicious and we have enough leftovers for tomorrow. I just know it's going to be the kind of dish that just improves exponentially when kept overnight in the fridge. What is that magic?

Ingredients
  • 2 tbsp olive oil
  • Pack of 6 chicken thighs, 
  • 2 medium onions, diced
  • 4 cloves of garlic, chopped
  • 2 green peppers, small diced
  • 2 carrots, small diced
  • 1 tbsp tomato puree
  • 1 tsp ground coriander
  • 1.5tsp sweet smoked paprika
  • 0.5tsp dried oregano
  • 6 cooking chorizo (M&S), sliced
  • 1 400g chopped tomatoes
  • 300ml white wine
  • 1 pint of water plus 1 chicken stock cube
  • 1 tin butter beans
  • 1 tin borlotti beans
  • 1 jar green pitted olives
  • handful chopped coriander
  • s&p
Fry the seasoned chicken thighs in the oil and remove from pan. Then soften the onions, garlic, carrots and peppers in the pan with the ground coriander, smoked paprika & oregano. Then add the wine and reduce by half. Then put the chicken back in and add the chorizo, stock and tinned tomatoes, seasoning and tomato puree. Bring to boil then simmer for one and a half hours. When the chicken is tender and falling off the bones, add the beans, olives and return to the boil for 10mins. Throw in the coriander, season to taste and serve.


Friday, 12 August 2011

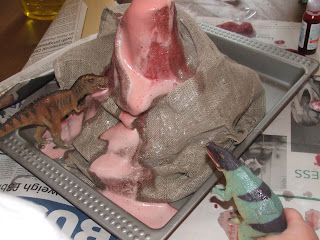
Erupting Volcano Experiment - Dinosaur Land's natural disaster

Today, I came through on my promise to the boys to get the volcano we put in Dinosaur Land to erupt.

I found a similar experiment in a book we have called 100 Science Experiments for Kids.

What we needed;

  • The volcano we made (a 500ml plastic bottle - I think it may have been Oasis, with silver foil crunched to make a volcano shape around it and some hessian/burlap type material loosely wrapped around the foil - to look like rocky form)
  • a baking tray on newspaper (we had to take the volcano out of dinosaur land to ensure we could survive the mess)
  • 250ml vinegar (we used pickling vinegar)
  • a squirt of washing up liquid
  • a squirt of red food colouring
  • a generous heaped teaspoon of bicarb (the book suggested wrapping this in a small square of tissue - but we found this didn't work that well - maybe because we used kitchen roll and it was too thick?)
  • Some dinosaurs for effect.

You put the volcano on the baking tray,  fill the volcano with the liquids and mix.
Then add the bicarbonate of soda and stand back! Great fun


Thursday, 11 August 2011

Dinosaur Land

A while ago we converted the train table into Dinosaur land. We included a desert, a mud swamp (in tuperware to try to contain the mess!), a silver foil and cotton wool sea and river, a volcano, a plateau and a couple of forests made with egg boxes, cardboard and leaves from the garden.  We spent a full afternoon creating it and the boys have really enjoyed having a change from the train table. Just need to think up some other ideas....

Related Posts Plugin for WordPress, Blogger...